Terraform Basic and Advance
Hello Team, My name is Abhishek Reddy, I have a 3 years experience in AWS Devops Engineer, I also Certified in AWS Cloud Practitioner, AWS Solution Architect - associate, AWS Devops Engineer - Professional Anything related to AWS Devops kindly connect me in LinkedIn
What is Terraform?
Terraform is an infrastructure as code tool that lets you build, change, and version cloud and on-prem resources safely and efficiently.
HashiCorp Terraform is an infrastructure as code tool that lets you define both cloud and on-prem resources in human-readable configuration files that you can version, reuse, and share. You can then use a consistent workflow to provision and manage all of your infrastructure throughout its lifecycle. Terraform can manage low-level components like compute, storage, and networking resources, as well as high-level components like DNS entries and SaaS features.
How does Terraform work?
Terraform creates and manages resources on cloud platforms and other services through their application programming interfaces (APIs). Providers enable Terraform to work with virtually any platform or service with an accessible API.
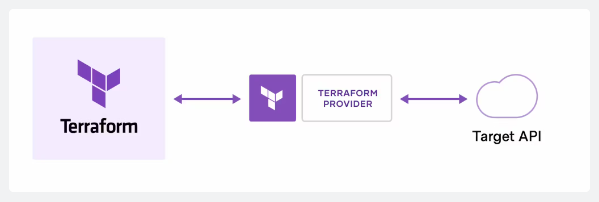
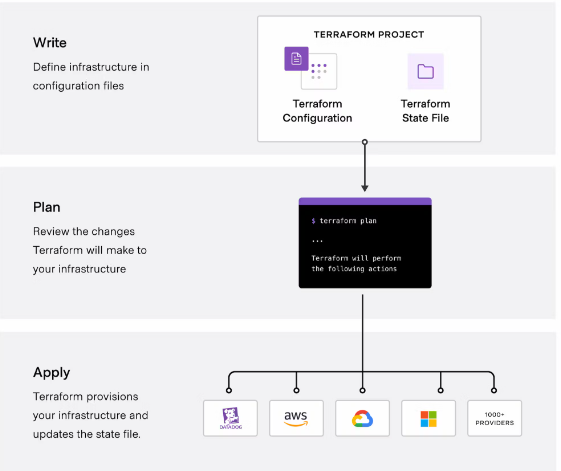
The core Terraform workflow consists of three stages:
Write: You define resources, which may be across multiple cloud providers and services. For example, you might create a configuration to deploy an application on virtual machines in a Virtual Private Cloud (VPC) network with security groups and a load balancer.
Plan: Terraform creates an execution plan describing the infrastructure it will create, update, or destroy based on the existing infrastructure and your configuration.
Apply: On approval, Terraform performs the proposed operations in the correct order, respecting any resource dependencies. For example, if you update the properties of a VPC and change the number of virtual machines in that VPC, Terraform will recreate the VPC before scaling the virtual machines.
Why Terraform?
Manage any infrastructure
Find providers for many of the platforms and services you already use in the Terraform Registry. You can also write your own. Terraform takes an immutable approach to infrastructure, reducing the complexity of upgrading or modifying your services and infrastructure.
Track your infrastructure
Terraform generates a plan and prompts you for your approval before modifying your infrastructure. It also keeps track of your real infrastructure in a state file, which acts as a source of truth for your environment. Terraform uses the state file to determine the changes to make to your infrastructure so that it will match your configuration.
Automate changes
Terraform configuration files are declarative, meaning that they describe the end state of your infrastructure. You do not need to write step-by-step instructions to create resources because Terraform handles the underlying logic. Terraform builds a resource graph to determine resource dependencies and creates or modifies non-dependent resources in parallel. This allows Terraform to provision resources efficiently.
Standardize configurations
Terraform supports reusable configuration components called modules that define configurable collections of infrastructure, saving time and encouraging best practices. You can use publicly available modules from the Terraform Registry, or write your own.
Collaborate
Since your configuration is written in a file, you can commit it to a Version Control System (VCS) and use Terraform Cloud to efficiently manage Terraform workflows across teams. Terraform Cloud runs Terraform in a consistent, reliable environment and provides secure access to shared state and secret data, role-based access controls, a private registry for sharing both modules and providers, and more.
How to Install Terraform
  sudo apt-get update && sudo apt-get install -y gnupg software-properties-common
  wget -O- https://apt.releases.hashicorp.com/gpg | \
  gpg --dearmor | \
  sudo tee /usr/share/keyrings/hashicorp-archive-keyring.gpg
  gpg --no-default-keyring \
  --keyring /usr/share/keyrings/hashicorp-archive-keyring.gpg \
  --fingerprint
  echo "deb [signed-by=/usr/share/keyrings/hashicorp-archive-keyring.gpg] \
  https://apt.releases.hashicorp.com $(lsb_release -cs) main" | \
  sudo tee /etc/apt/sources.list.d/hashicorp.list
  sudo apt update
  sudo apt-get install terraform
  terraform --version
Install AWS on Ubuntu machine
curl "https://awscli.amazonaws.com/awscli-exe-linux-x86_64.zip" -o "awscliv2.zip"
sudo apt install unzip
unzip awscliv2.zip
sudo ./aws/install
Hands-on practice terraform
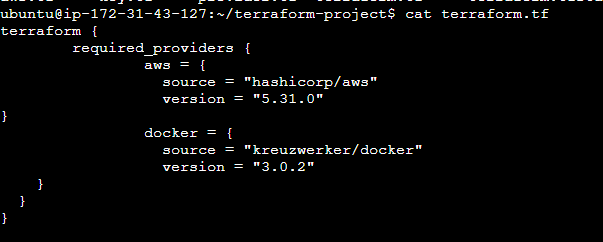
Add terraform required providers in terraform.tf
Add AWS provider in provider.tf

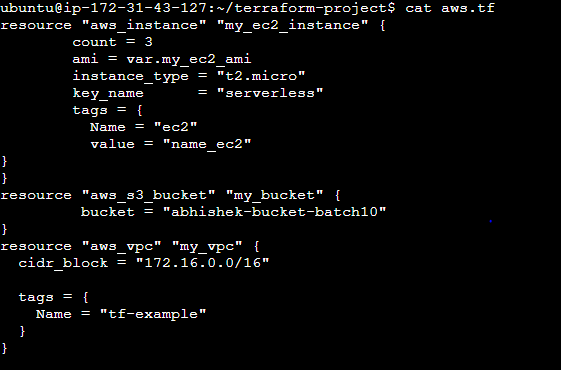
Created AWS Instance, AWS S3 Bucket, AWS VPC and key-pair, Hardcoded using variables


terraform init: This command is like setting up camp. It initializes your working directory, downloading any necessary plugins and setting up the backend. Think of it as getting your tools and gear ready for the journey.terraform plan: Now that your camp is set up, it's time to survey the terrain. This command shows you what changes Terraform will make to your infrastructure. It's like a preview before the actual deployment. It helps you understand the impact of your changes.terraform apply: Ready to make it happen? This command applies the changes outlined in the plan. It's like executing the blueprint you've designed for your infrastructure. Make sure you're ready for this step, as it can modify your actual infrastructure.
So, in summary: init prepares, plan previews, and apply executes. It's a careful dance to make infrastructure changes with confidence.
The
terraform.tfstatefile—the keeper of state secrets! This file is where Terraform stores the current state of your infrastructure. It's a JSON file that keeps track of the resources it has created and their current configuration.Here's why it's important:
State Tracking: Terraform needs to remember what resources it created, their configurations, and the relationships between them. The
tfstatefile is like a map of your infrastructure.Concurrency Control: When you run
terraform apply, it compares the desired state (what's in your Terraform files) with the current state (in thetfstatefile) to figure out what needs to be changed. This helps avoid conflicts in a team setting.Resource Metadata: The
tfstatefile not only tracks the resource configurations but also metadata like unique identifiers and dependency information. This is crucial for managing updates and dependencies between resources.
Remember, this file is sensitive! Don't mess with it manually unless you know exactly what you're doing. If you need to make changes, use Terraform commands (apply, destroy, etc.) to ensure the tfstate is updated correctly.
The trusty backup—
terraform.tfstate.backup! This file is a safety net, a copy of your previous state before anyterraform applyoperation. It's like a checkpoint you can roll back to if things go awry during an apply.Here's why it's useful:
Rollback Potential: If something unexpected happens during the application of changes (maybe your cat decides to walk on the keyboard), having the backup allows you to revert to the previous state quickly.
Disaster Recovery: Imagine accidentally deleting a critical resource. The backup file can be a lifesaver, letting you recover to the state before the deletion.
Consistency: Keeping a backup ensures consistency in your infrastructure. If an apply fails, you have a reliable snapshot to fall back on.
Remember, it's good practice to keep your terraform.tfstate.backup file secure, just like the terraform.tfstate file. Losing both could make your infrastructure recovery a bit trickier.
Terraform State File:
The Terraform state file is typically named
terraform.tfstateby default. It's a JSON file that contains information about the resources managed by Terraform, their current state, and dependencies. This file is generated when you apply your Terraform configuration for the first time.Here's a brief breakdown of what's inside:
Resources: Describes the resources Terraform is managing.
Metadata: Various metadata about the state itself.
Example:
Consider a simple Terraform configuration that provisions an AWS S3 bucket:
    provider "aws" {
      region = "us-west-2"
    }

    resource "aws_s3_bucket" "my_bucket" {
      bucket = "my-unique-bucket-name"
      acl    = "private"
    }
When you run terraform apply, Terraform creates the resources and generates a state file. The terraform.tfstate might look something like this:
    {
      "version": 4,
      "terraform_version": "0.14.7",
      "serial": 1,
      "lineage": "a43ab8a1-4b0c-4e68-9c7b-71ab5e0f49b8",
      "outputs": {},
      "resources": [
        {
          "mode": "managed",
          "type": "aws_s3_bucket",
          "name": "my_bucket",
          "provider": "provider.aws",
          "instances": [
            {
              "index_key": "",
              "schema_version": 0,
              "attributes": {
                "acl": "private",
                "arn": "arn:aws:s3:::my-unique-bucket-name",
                "bucket": "my-unique-bucket-name",
                "force_destroy": false,
                "id": "my-unique-bucket-name",
                "region": "us-west-2",
                "tags": {},
                "website": []
              },
              "private": "********",
              "dependencies": []
            }
          ]
        }
      ]
    }
This is a simplified version, but it gives you an idea. It shows details about the AWS S3 bucket created, such as its ARN, ACL, and region.
Remember, this state file is crucial. It's your infrastructure's memory. Keep it safe, and consider using remote backends for collaboration and better management.
Terraform modules are like Lego pieces for your infrastructure. They allow you to encapsulate and reuse parts of your configurations. Let's walk through a simple example to illustrate how to create and use a Terraform module.
Step 1: Create a Module
Create a directory for your module, let's call it
s3-module. Inside this directory, you might have a file namedmain.tf:# s3-module/main.tf variable "bucket_name" { description = "The name of the S3 bucket" } resource "aws_s3_bucket" "my_bucket" { bucket = var.bucket_name acl = "private" }This module takes a parameter
bucket_nameand creates an S3 bucket with that name.Step 2: Use the Module
Now, in your main Terraform configuration (let's call it
main.tf), you can use this module:# main.tf provider "aws" { region = "us-west-2" } module "s3_example" { source = "./s3-module" bucket_name = "my-unique-bucket-name" }In this example, we're using the module we created. We specify the source as the relative path to the module directory and provide a value for the
bucket_namevariable.Step 3: Apply the Configuration
Run the following commands in your terminal:
  terraform init
  terraform apply
Terraform will initialize and then prompt you to confirm the changes. If everything is set up correctly, it will create the S3 bucket using the module.
Step 4: Destroy the Resources
When you're done, you can clean up the resources:
terraform destroyThis is a basic example, but modules can get much more sophisticated, allowing you to create reusable, parameterized pieces of infrastructure. They're handy for keeping your configurations DRY (Don't Repeat Yourself) and promoting maintainability.
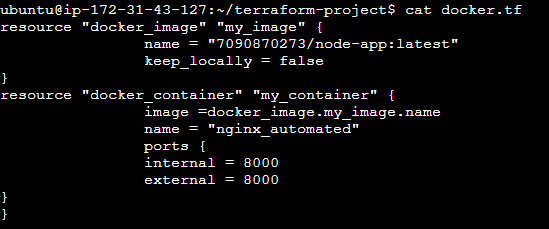
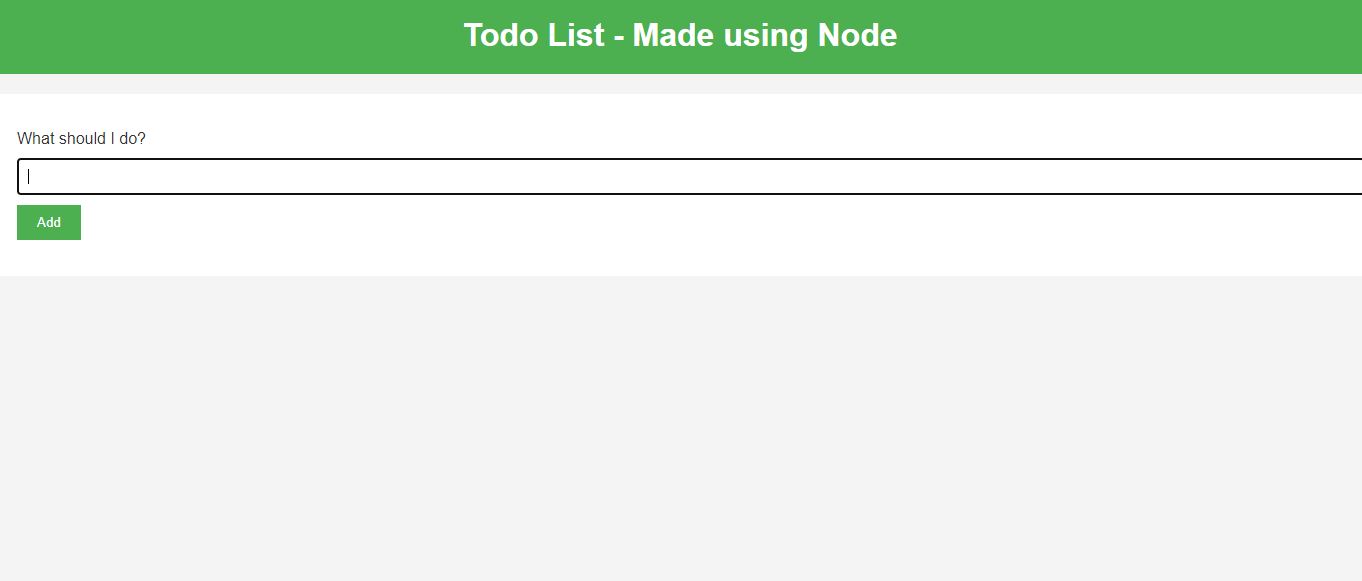
Deployed first application (node-app) using docker and terraform
Install docker in ubuntu
sudo apt-get updatesudo apt-get install docker.io
sudo usermod -aG docker ubuntu (to avoid permission denied we added into ubuntu group)
sudo apt install nodejssudo apt install npmnpm installnode app.jsdocker build -t node-app:latest .
docker run -d -p 8000:8000 node-app:latest
docker tag node-app:latest Dockerhubusername/node-app:latest
docker login (enter username and password)
docker push dockerhubusername/node-app:latest